"The people who give you their food give you their heart" - Cesar Chavez


Showing posts with label Side Dish. Show all posts

Wednesday, June 16, 2010

Andy & Yihsin's Vietnamese Spring Rolls

I recently made summer rolls for dinner and while they were yummy, they were not even close to Vietnamese spring rolls. My first encounter with Vietnamese spring rolls was when I went to Hanoi, Vietnam while studying abroad in Singapore. Every little nook and alley was jam packed with small plastic tables and colored chairs, the kind you used in Kindergarten while doing art projects. Women were crouched down with large flat pans and mounds of lightly fried Vietnamese spring rolls oozing with delicious aromas and flavors. Throughout the night markets and at little cafes, you would have the option of fried or fresh spring rolls. I loved the crispy outside of the fried ones but in the hot and humid weather I nearly always opted for the fresh spring rolls. On a recent dinner gathering, my good friends Andy and Yihsin teamed up to make and roll  the most delicious spring rolls I've had since the alleys of Vietnam. Here is a picture of Andy and Yihsin, working a filling and rolling assembly line to make their own mound of delicious spring rolls:
They served their spring rolls with a delicious fish sauce pictured here:

Ingredients:
Rice papers
Rice noodles
Shrimp
Bean sprouts
Cilantro
Beets, thinly sliced like matchsticks
Mint
Peanuts, crushed
Carrots, shredded

For sauce:
Fish sauce
Vinegar
Sugar
Jalapenos, diced

Directions:
1. Stir sugar and salt in a pot of boiling water until it dissolves.  Pour it into a large boil filled with ice. Put in the raw shrimp and let it sit in the brine refrigerated for 20-60 minutes. Remove from brine and drain and rinse it thoroughly.
2. Cook the rice noodles according to directions.
3. Mix all the ingredients for the fish sauce, cover and refrigerate.
4. Working with one wrapper at a time, place the wrapper in a shallow pan of room temperature water, about 7-10 seconds per a side. Then place the sheet on a plate, fill it with all  the ingredients and wrap into a summer roll. Enjoy!

Friday, June 11, 2010

Halibut Fish Sticks with Dill Caper Tartar Sauce

When most people hear the words "fish sticks" they think of those unidentifiable pieces of breaded fish that come packaged in a box and we heat up in the oven and eat with ketchup. I remember my mom heating up fish sticks and I loved them! We usually had them with ketcup, a side of steamed green peas and a warm loaf of San Francisco sourdough. For me, fish sticks out of a box is comfort food. So, taking it to the next level, I decided to make a healthier, maybe a slightly gourmet, version of fish sticks. And, since they are supposed to be served with tartar sauce, I did that too. I had some really great ingredients to work with: like my good friend's mom's homemade dill pickles! Fresh halibut. Honey panko crumbs. On a sunny Sunday some friends and I met for a picnic and I brought these fish sticks, some may call them fish nuggets due to their size, and tartar sauce. I will definitely be making these again and most likely in a larger quantity. The great part, is that these are super easy to make and healthy.

Halibut Fish Sticks with Dill Caper Tartar Sauce
(Adapted from recipe on epicurious.com)

Ingredients:
For tartar sauce:
1/2 cup light mayonnaise
2 1/2 tablespoons chopped fresh rosemary
2 tablespoons drained capers
2 tablespoons chopped fresh chives
2 heaping tablespoons chopped dill pickles
1 tablespoon juice from dill pickle jar

For fish sticks:
2 pounds halibut fillets, cut into strips
2 cups honey panko
2 large eggs
2 tablespoons olive oil, plus more as needed

Directions:
1. For the tartar sauce, mix the ingredients in a bowl. Season with salt and pepper. Cover and chill until ready to serve.
2. For the fish sticks: whisk the eggs in a small bowl. Pour the panko crumbs onto a shallow dish.  Heat the olive oil in a pan over medium high heat. Douse the halibut strips in the egg mixture then generously coat with the panko. Place them on the pan and let cook until golden brown on each side, about 2-3 minutes per side. Serve with tartar sauce.

Wednesday, May 26, 2010

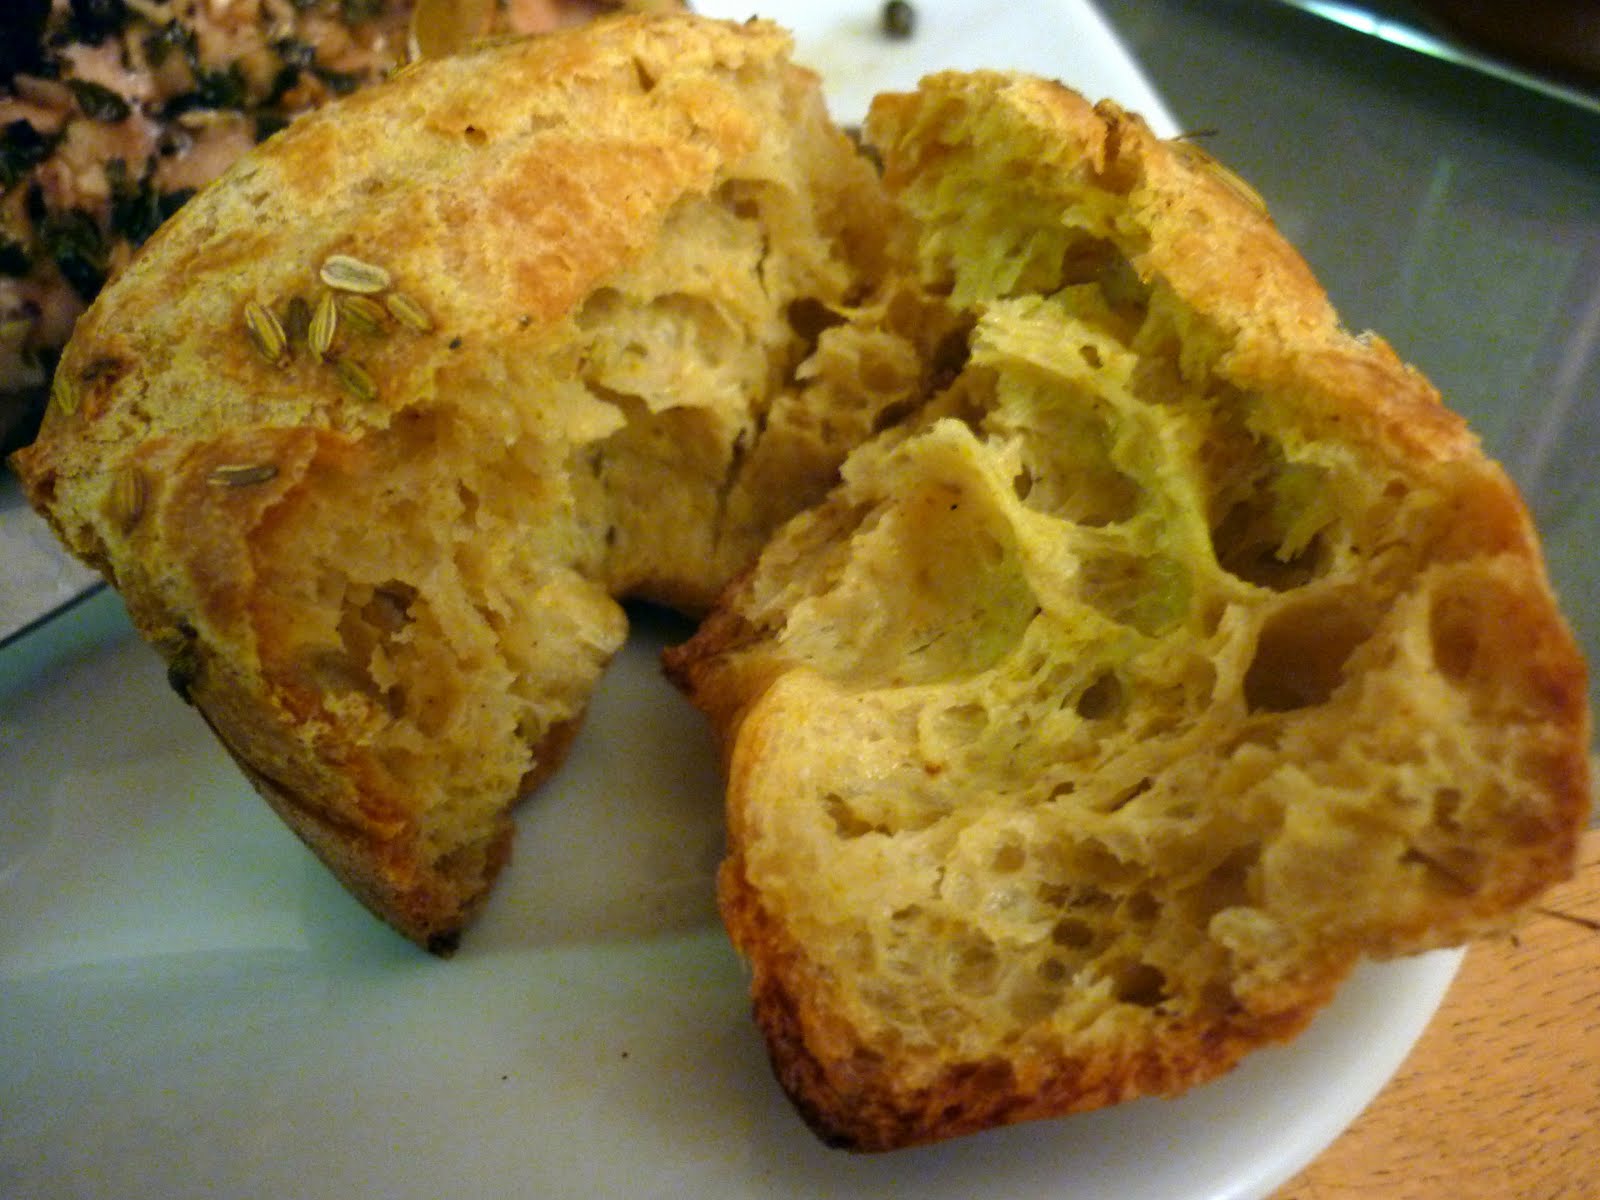
Curry Cumin Popovers


The first time I ever experienced a popover was with my mom at a cafe in Union Square, San Francisco. I remember loving their light fluffiness on the inside and the slight crispiness on the outside. I believe they are called "popovers" because of the way they pop over the sides of the muffin tins. Last Wednesday evening was a special occasion: we were having a small belated Birthday dinner for Andy. He just returned from Chicago the night before and I wanted to make a nice, healthy and tasty dinner meal to celebrate his birthday. I decided this would be the perfect opportunity to bust out with some popovers. These are super easy to make and very tasty. Since the popovers were going to have Indian spice flavors I decided to serve these with hot mango chutney. The sweetness and mango chunks of the chutney were the perfect compliment to the subtle spice and fluffiness of the popovers. These are easy and delicious and sort of elegant - perfect for a weeknight meal.
                           
Curry Cumin Popovers

Ingredients:
1/2 teaspoon cumin
2 large eggs
3/4 cup soy milk
1/4 cup water
1 tablespoon unsalted butter, melted
1 cup minus 2 tablespoons all-purpose flour
1/2 teaspoon salt
1 teaspoon curry powder
2 tablespoons fennel seeds

Directions:
1. Preheat the oven to 375 degrees. Spray nine cups in a muffin tin.
2. In a bowl, whisk the eggs, milk and water. Add the butter in a stream, whisking. Add the flour and salt and whisk until the mixture is slightly lumpy, then add the curry and cumin powder.
3. Divide the batter evenly among tins and sprinkle the fennel seeds over the popovers. Bake on the lower third rack of the oven for 40 minutes. Cut a slit on top of each popover with a small sharp knife and bake for 5 minutes more.
 

Monday, May 17, 2010

Summer Rolls with Spicy Peanut Dipping Sauce


In 2007, I studied abroad in Singapore, and had the wonderful experience of traveling through South East Asia. While I was traveling on a shoe string, I had no problem trying all the delicious street food. In Vietnam, every corner had a little old lady making Vietnamese spring rolls. You could get them with shrimp or vegetarian and you had the option of fresh or fried. Since then, I have loved making Vietnamese spring rolls but I haven't posted about them because I have failed to take proper pictures. These were made by my good friend and we were in a bit of a rush so we weren't able to get pictures of the whole process. However, I promise that there will be many more Vietnamese spring roll postings as there are so many variations of this to be made. With this particular batch, I was limited to the contents of my refrigerator. I decided to make this batch fresh since it was a hot summer night that we had these. After we made the spring rolls, I noticed I was out of my Trader Joe's Thai Peanut Dipping Sauce (gasp!). But alas, I was able to improvise with some spicy peanut butter from Peanut Butter & Company and some other ingredients. Consider this recipe a great first time spring roll recipe. Here is a picture of our Vietnamese spring rolls and a heaping bowl of pad Thai.
Vietnamese Spring Rolls

Ingredients:
Rice wrappers
1 small cucumber, cut into matchsticks
1 large carrot, cut into matchsticks
3 hearts of palms, sliced into matchsticks
3/4 avocado, sliced thinly
1/2 cup tofu, sliced thinly
1 small bunch fresh mint leaves
Spicy Peanut Sauce:
4 tablespoons peanut butter
1 teaspoon cayenne pepper
1 tablespoon soy sauce
1 teaspoon lemon juice

Directions:
1. Prepare all the vegetables and set aside.
2. Fill a skillet with room temperature water. Using one rice wrapper at a time, lay it gently in the water and allow it to absorb the water and soften for about 25-30 seconds. You don't want it to sit for too long or you won't be able to use it. Using both hands, remove the wrapper from the water and allow it to drip excess water over pan. Lay on a plate.
3. Place the vegetables and tofu and mint in a nice neat pile in the center of the rice wrapper. Fold over one side, then the bottom, then the top, then gently roll the spring roll until it is sealed.
4. To prepare the spicy peanut sauce, mix all the ingredients in a small glass bowl, microwave it for 45 seconds. Mix again and serve.

Wednesday, May 12, 2010

Stuffed Artichokes

The first time I had stuffed artichokes was at my cousin, Megan's, birthday dinner at this delicious Italian restaurant called Bacaro in the Lower East Side. Unfortunately, I have no recollection of what the artichoke was stuffed with, however I remember enjoying it very much! Other than that, my only experience with whole artichokes has been my mom boiling them and serving them up with mayonnaise. Artichoke hearts are always the tastiest part. A good friend, John, was in town for the night because he to do some work in lower Manhattan, so he came over for dinner and I thought this would be a nice appetizer. It went along quite well with the fennel and cabbage salad and a main dish of salmon. I got inspiration for this recipe on, you guessed it, Artichokes.org...When in doubt, just go to "Name of food".org or com and you should find some good stuff!
Stuffed Artichokes
(Makes 4 servings)

Ingredients:
2 large artichokes
1 cup herbed bread crumbs
1/4 cup grated parmesan cheese
1/8 cup olive oil
2 cloves garlic, minced
2 tablespoons fresh Italian parsley, chopped
1 tablespoon dried oregano
Ground pepper
2 cups water

Directions:
1. Preheat oven to 350 degrees. Wash artichokes under cold running water. Cut off stems at base and remove small bottom leaves. Cut off top quarter of artichokes; discard. Spread leaves, remove center leaves and fuzzy centers with a spoon and discard.
2. Toss bread crumbs with cheese, olive oil, garlic, parsley, oregano, and pepper to taste. Stuff bread crumb mixture between leaves of artichokes and fill centers.
3. Place stuffed artichokes in a 9-inch square baking dish. Pour 2 cups boiling water around the artichokes. Cover with lid or foil. Bake for 40 minutes or until artichokes are tender. Remove artichokes from baking dish and place on rack; cool to room temperature.
                             

Monday, May 3, 2010

Perfect Green Beans and Roasted Root Vegetables


I love making a ton of tasty vegetables and having them last all week to throw in with salads and couscous for lunches. That wasn't the case with these vegetable dishes as they only lasted for dinner but they would have been great with lunch too! As part as a dinner for 6 people, these were the side vegetable dishes to accompany the stuffed salmon. Seasoned, flavored, and prepared with very fresh ingredients, these two simple dishes are two of my favorites.

Perfect Green Beans:

Ingredients:
Green beans, ends cut off
Lemon Juice
6 cloves garlic, minced
1/3 white onion, chopped
1/3 cup sliced almonds
Pinch of salt

Directions:
1. Heat some olive oil in a skillet and saute the garlic until fragrant, through everything else in and saute for about 25 minutes. Enjoy!

Roasted Root Vegetables:

Ingredients:
Carrots, cut into large pieces
Baby russet potatoes, halved
Cumin
Fresh dill, chopped
Olive oil

Directions:
1. Preheat the oven to 400 degrees.
2. Place all the ingredients in a large bowl and toss with your hands to get the carrots and potatoes evenly coated with the olive oil, cumin and dill.
3. Place on a baking sheet and roast for about 30 minutes, until cut side of potatoes is a dark crispy brown.

Thursday, April 22, 2010

Warm Goat Cheese Salad

The first time I ever had warm goat cheese was also the first time I ever really started enjoying cheese. I can't remember where I was, but I know I was with my cousin Megan and it was part of a salad and it was in 2008 I think. Since then, I haven't had warm goat cheese. With Megan and Sarah coming for dinner I though it was the perfect opportunity to try and make a warm goat cheese salad. This was last Saturday and to make less work for the evening meal, I decided to do all the prep work for the goat cheese rounds in the morning. This definitely helped because it made the cheese firm with the crust so that it was easier to fry. I served these warm rounds with fresh strawberries, mixed greens and almond slices. The salad was fresh, and the creaminess of the goat cheese was the perfect compliment.
Warm Goat Cheese Salad

Ingredients:
1 cup panko crumbs
2 tablespoons fresh thyme, chopped
2 tablespoons fresh parsley, chopped
2 tablespoons fresh basil, chopped
1/2 teaspoon ground pepper
12 ounces goat cheese, in roll form
2 egg whites - beaten until frothy
Olive oil
Mixed greens
Strawberries, sliced
Sliced almonds

Directions:
1. In a bowl, combine the panko crumbs, thyme, parsley, basil and ground pepper.
2. Slice the goat cheese and use your hands to make rounds. Beat the eggs whites in a separate bowl until they are frothy. Dip the goat cheese rounds into the egg white mixture, then the panko mixture and place on a plate. Cover and chill for at least one hour, up to 8 hours.
3. Prepare the salad of mixed greens, strawberries and sliced almonds in a large bowl.
4. Heat olive oil in a skillet over medium high heat. Place the goat cheese rounds on the skillet and let sizzle for about 3 minutes on each side. You want the crust to turn a nice golden brown. Serve warm with salad.
5. For a dressing, mix and taste olive oil, red wine vinegar, honey, and lemon juice.

Monday, April 19, 2010

Moroccan Carrot Salad

My good friend and I decided to make gyros for dinner. I peaked into a falafel shop to see what toppings they were serving with their shawarma and I saw this lovely looking carrot salad. I have heard of Moroccan carrot salads before, but I had yet to make one. The ginger in this salad is what really brought the whole thing together. Also, I recommend making this few hours before you plan to eat it because it really tastes much better after the ingredients have set for a few hours. Carrots used raw in salads is a relatively new addition to our culinary history. Europeans would eat carrot cooked in stews however it was primarily in Northwestern Africa that raw carrots became a feature of salads. Since then the raw carrot salad has spread east to Israel and it is now a typical Rosh Hashanah dish. Also, I found that raw carrot salads were frequently served as accompaniments to at Israeli restaurants with bread, pickles, hummus and cabbage salad. There are a number of different ways to make this salad and had I had some harissa (a northwest African chili paste) I certainly would have used that! I used basil in this carrot salad because I didn't have any fresh mint, however feel free to swap the basil and mint. Other options for ingredients that would taste good in this include orange juice, orange blossom water, or a little bit of plain yogurt. Enjoy your leftovers for lunch or with couscous! Here is a picture of the carrot salad with the other gyro accompaniments:
Moroccan Carrot Salad

Ingredients:
1 lb carrots, peeled and thinly sliced
1/4 cup olive oil
4 tablespoons lemon juice
1/4 cup chopped fresh basil
5 cloves garlic, minced
1 1/2 teaspoons cumin
1 teaspoon cinnamon
1 teaspoon cayenne pepper
3 small green chilies, minced

Directions:
1. Mix all the ingredients together in a bowl. Cover and chill for at least 2 hours or up to two days.
2. Bring to room temperature before serving.

Monday, March 29, 2010

Tangy Potato Salad

A new take on your standard potato salad makes for a slightly tangy, and a little crunchier version. Simple, quick easy and satisfying the leftovers even taste great! Combined with a meal of deviled eggs, flaky cheddar biscuits and tomato soup, this was the perfect fresh dish. I used equal parts mayonnaise and  grainy Dijon mustard which added to the tangy punch. I don't think I have ever used tarragon in a recipe but after doing some potato salad research, I learned that it's a pretty standard herb to use.

Tangy Potato Salad

Ingredients:
3/4 lb mini Russet potatoes
3/4 lb mini Yukon potatoes
1 cup heirloom tomatoes, chopped
3 large celery stalks, chopped
2 green onions, chopped
1 handful fresh parsley
 2 teaspoons dried tarragon
1/2 cup mayonnaise
1/2 cup grainy Dijon mustard
1 1/2 teaspoons lemon juice
Ground pepper

Directions:
1. Bring water to a boil in a pot. Add potatoes, cover and reduce the heat to bring the water to a simmer for about 20-25 minutes, until the potatoes are tender. Drain and run with cold water to prevent potatoes from cooking more.
2. While potatoes are simmering, chop and mix the tomatoes, celery, green onions and parsley. In a separate smaller bowl make the dressing by mixing the mayonnaise, mustard, lemon juice, tarragon and pepper.
3. When potatoes have cooled, chop and mix in with the tomato mixture. Add dressing and lightly toss just until it is evenly incorporated.

Tuesday, March 23, 2010

Cheddar Biscuits

I love biscuits. They are versatile, good for any meal, and the perfect comfort food. This batch came out particularly flaky which was nice. I found this recipe on the blog, Laura's Recipe Collection and made some changes to create a slightly healthier version. I cut the butter and used olive oil instead. This makes the biscuit keep it's moistness and it's much better for you. Each layer was like moist biscuit goodness. My good friend, Soma, was visiting and we decided to prepare a Southern comfort feast which included cheddar biscuits, potato salad, deviled eggs, tomato soup and a chocolate mess cake for dessert. In the way that grilled cheese is a lovely accompaniment to tomato soup, these biscuits work the same magic. Any leftovers can be frozen and reheated to provide for the same warm, flaky, fresh taste. I'm sure these would be good with fresh cracked pepper, chili flakes or fresh dill. Happy Biscuiting!

Cheddar Biscuits

Ingredients:
2 cups flour
1 tablespoon baking powder
1 1/2 teaspoons kosher salt
3/4 stick unsalted butter, melted
3/4 cup olive oil
1/2 cup cold buttermilk, plus a little more
1/4 cup fake eggs
1 heaping cup grated cheddar cheese

Directions:
1. Preheat the oven to 425 degrees. Line a baking sheet with parchment paper.
2. Mix the flour, baking powder and salt in a large bowl. Pour in the butter, olive oil, buttermilk, and fake eggs. Whisk well, until everything is incorporated. Fold in cheddar cheese, adding more if you think necessary just until combined
3. Place the dough on a lightly floured surface and roll out into a rectangle that is 2/3" thick.
4. Using a sharp knife that is dusted with flour, cut the dough into triangular wedges. Lightly brush the top of the biscuits with buttermilk. Bake the biscuits for 20-25 or until they are slightly golden brown on top.

Monday, March 15, 2010

Rosemary Roasted Potatoes

My boyfriend wasn't feeling well last Monday and one of my best friends, Andy, hurt his ankle at work so I wanted to make a nice, wholesome, healthy comfort food meal for them both. Nothing like a meal made with love to cheer us up from the usual Monday blues. As a side dish to a stuffed chicken which I will share tomorrow, I made roasted potatoes with rosemary and toasted walnuts. The longer the walnuts were in the oven, the crispier they got and the more flavor came out. I highly recommend letting the walnuts turn dark brown/black for their best flavor. I learned a valuable lesson from this dish: potatoes retain a lot of heat and get really hot. I burned my hand on the pan and my gum, biting into the potato too soon.

Rosemary Roasted Potatoes

Ingredients:
New potatoes, halved
Olive oil
Walnuts, chopped
Fresh rosemary, removed from its sprigs
Garlic powder
Fresh ground pepper

Directions:
1. Preheat the oven to 450 degrees.
2. Place all the halved potatoes in a bowl and drizzle with olive oil. Toss with fresh rosemary and walnuts until incorporated. Sprinkle garlic powder and fresh ground pepper over potato mixture. Place on a pan and roast for 35-45 minutes, until white sides of potatoes have darkened and turned crispy with flavor.

Thursday, March 11, 2010

Stuffed Poblano Peppers

I have never had a poblano pepper until this meal. I was excited about them because I love the way stuffed vegetables look for dinner. This was part of a Mexican themed Shabbat dinner I was preparing for my Dad and boyfriend. This was the side dish. Filling, healthy, versatile, flavorful and vegetarian. I came across this fantastic recipe on the blog Budget Bytes and adapted it slightly. I can tell you right now that my stuffed poblano peppers do not look as glamorous and picture ready as they do on the blog. Perhaps I over stuffed them? Or the peppers were too soft to hold they shape during their de-seeding and dissection. Regardless of their appearance, the combination is wonderful! I would love to make these again and include chicken or beef, corn or perhaps pineapple pieces. My boyfriend's Mom, Elaine, makes a wonderful salsa that we used in these stuffed poblanos; it has great large chunks of peppers, tomatoes and onions. Because I had leftovers of the stuffing mixture, we just ate it with corn chips. Any leftovers can be used in tortillas, breakfast burritos or quesadillas anyone?

Stuffed Poblano Peppers:
(Makes 4 peppers with extra stuffing)

Ingredients:
3/4 cup long grain rice
1 1/2 teaspoons paprika
1 1/2 teaspoons garlic powder
1 1/2 teaspoons onion powder
4 medium-large poblano peppers
4 ounces Monterey jack cheese, shredded
3/4 cup salsa
1 can black beans
Olive oil spray

Directions:
1. Cook the rice with 2 cups of water. Mix in paprika, garlic powder and onion powder with the rice. Set aside when ready. Mix in the black beans to the rice.
2. Preheat oven to 400 degrees and turn the broiler on high. Spray a baking sheet and coat all sides of the poblano peppers with non-stick spray. Place the baking sheet a few inches under the broiler (I use the second rack level) and broil on both sides for 5 minutes.
                         
3. After broiling the peppers, their skin should be blistery and bubbly. Immediately place the peppers in a zip-lock bag and let them steam for about 15 minutes. This will help remove their skin more easily.
4. Cut a slit down each the pepper and carefully remove the seeds and the seed pod.
5. Preheat the oven 350 degrees (bake not broil this time). Gently stuff the peppers with the rice and bean mixture followed by a large dollop of salsa and covered with shredded cheese. Stuff the poblano to the brim and then bake until the cheese is melted, about 20 minutes.
                          

Friday, February 19, 2010

Chicken Salad

My first time having chicken salad, other than Chinese chicken salad in California, was at my boyfriend's grandmother, Bess's, home. She prepared a delicious lunch for us of chicken salad, biscuits and vegetable beef soup. On most Sunday afternoons, we still crave this meal. This was very much the inspiration for our Valentine's dinner but we changed it up a bit and swaped the vegetable beef soup for mushroom barley soup. This chicken salad is very easy to prepare and has a lovely contrast of sweet and salty with the grapes and pickles. Combined with the dill biscuits, we had fantastic chicken salad sandwiches with grainy mustard and crisp lettuce.
                          
Chicken Salad

Ingredients:
7 chicken breast tenderloins
1 1/2 cups red seedless grapes, halved
3 celery stalks, chopped
6 crunchy kosher pickles, chopped
1/2 cup mayonnaise
1 heaping tablespoon tarragon
Olive oil
Thyme
Ground pepper
Garlic powder

Directions:
1. Preheat the oven to 350 degrees.
2. Place the chicken breast tenderloins on a baking sheet. Drizzle with olive oil and sprinkle with thyme, ground pepper and garlic powder. Bake for 13-15 minutes, until chicken is cooked through.
3. When chicken has cooled, shred the meat from the bones into thick chunks. Place chicken in a bowl with grapes, celery, and pickles. Add mayonnaise and mix with forks to incorporate. Add tarragon and mix until it is evenly distributed.

Assembling Chicken Salad Biscuit Sandwiches:
1. Slice biscuit in half and remove some of the flaky parts in the center. This part is delicious to eat on its own.

                      
2. Add grainy mustard on each half of the biscuit.
                       
3. Pile with chicken salad, lettuce and any other accompaniments.
                       

Thursday, February 11, 2010

Leaning Stacks of Polenta

This is my second time cooking with polenta (the first was a polenta lasagna). The goal was to use up the ingredients in my refrigerator while making a light late afternoon lunch for two. The fun part was making it look fancy. I'm still learning what flavors taste great with polenta, cheese and marinara definitely come to mind. I still haven't made my own polenta, I have been buying the rolls of it from Trader Joe's, but I would like to make my own and leave it soft for a shrimp and grits, except shrimp and polenta type of meal. I used the left over polenta to cut into small cubes and broil in the oven for croutons for my salad. As I am writing this post I am listening to Amos Lee's "Keep it loose, keep it tight." Aside from his beautiful voice and relaxing melodies, the lyrics really spoke out to me and I just wanted to share them, well one line "we all need a place where we can go and feel over the rainbow." I guess we can all interpret this how we want but it's a beautiful that all people are more similar than we think and while we might have different jobs, different relationships, different lifestyles, we all need a place, whether mental or physical to feel over the rainbow.

Leaning Stacks of Polenta
(Makes 3 leaning stacks)
Ingredients:
6 slices of polenta, 1 1/2 inches thick
Haricot green beans
1 large shallot, diced
2 celery stalks, chopped
Marinara sauce
Olive oil
Garlic powder
Ground pepper
Dried chili flakes

Directions:
1. In a pan over medium hight heat saute the shallots with a bit of olive oil. Mix around for a few minutes then add the green beans and celery. Sprinkle with a bit of garlic powder and ground pepper.
2. Add the polenta slices to the pan and lightly drizzle the top with olive oil. Sprinkle on garlic powder, ground pepper and chili flakes. Let the polenta slices cook on each side for about 5-6 minutes, or until the top of the slices get a slightly golden hue.
3. Place one slice of polenta on a plate, top with the green bean and celery mixture and top with another slice of polenta.
4. Drizzle the top of the polenta stack with some marinara. Enjoy!

Wednesday, February 10, 2010

Grilled Romain with Toasted Hazelnuts

After my recent excitement over caesar salad, my boyfriend shared with me that at a restaurant he used to work at they would grill the romaine lettuce for their caesar salads. So on a Sunday night I decided to make a fancy caesar salad, kicking it up a notch if you will. This salad, while an improvisation on the ingredient front, tasted delicious and is definitely a good accompaniment for any meat dish or hearty soup. We had ours with a green lentil soup and a chewy fresh loaf of garlic bread. This salad is fancy tasting, elegant looking and very easy to make. The toasted hazelnuts have a smoky flavor, the blue cheese has a pungent creamy flavor, and the marinated artichoke has a delicious salty flavor. All of these are tied together with the grilled romaine and creamy dressing for a fantastic salad. I use one of those indoor grills that spans over two stove top burners. For the most part, it works great, except it smokes up the entire apartment and requires opening up most the windows and the front door! All for a little grilled romaine.

Ingredients:
Whole romaine lettuce leaves
Marinated artichoke hearts, chopped
Blue cheese, crumbled
Hazelnuts
Caesar dressing
Olive oil
Ground pepper
Dried chili flakes

Directions:
1. Heat up a grill. Place the romaine lettuce leaves in a bowl and drizzle with olive oil, ground pepper and dried chili flakes. Toss to get the leaves evenly seasoned.
2. Broil the hazelnuts in the oven for about 4 minutes. Set aside
3. Spray the grill with a little bit of cooking spray. Place the leaves on the grill and grill for about 30 seconds per a side. You want to see grill marks on the romaine but you don't want the leaves to wilt and loose their crispness.
4. Set the grilled romaine aside in a bowl. Top with the chopped artichoke hearts, toasted hazelnuts, crumbled blue cheese and drizzle the caesar dressing over the whole lot. Gently toss to incorporate.

Monday, February 8, 2010

Thyme Roasted Carrots

I just got a spice canister of dried Thyme and the first thing I decided to make with it was roasted carrots. This dish is easy, flavorful, healthy, and adds a ton of color to your plate! See picture of carrots with pecan crusted salmon and edamame mash:
                           
Thyme Roasted Carrots

Ingredients:
Whole carrots, sliced into quarters
Olive oil
Fresh ground pepper
Dried thyme
Chives, sliced for garnish

Directions:
1. Preheat the oven to 400 degrees.
2. Spread the carrots on a baking pan. Drizzle with olive oil and generously sprinkle with ground pepper and thyme. Gently toss on the pan to evenly coat.
3. Bake in the oven for 35-40 minutes, when carrots are starting to get a golden hue and the thyme is starting to crisp. Sprinkle with chives and serve warm.

Thursday, February 4, 2010

Steamed Vegetarian Dumplings

I had a little dumpling wrapping and eating extravaganza which satisfied our dumpling appetites for a month. I had made three different kinds of dumpling fillings and put three eager wrappers to work. We had too many dumplings to count in pork and chive, shrimp and bamboo shoot and vegetarian. Andy, who has wrapped dumplings since he was a kid, had some fancy little folds that made his dumplings look like they are from a restaurant! Here is a picture of dumpling wrapping in action:
                         
I really liked the taste of the vegetable dumpling wrappers which get their green color from spinach. The tofu mixture for the vegetarian dumplings did not adhere as well as the pork and shrimp mixtures, but it still tasted great! Unfortunately we ran out of wrappers before we finished the mixtures, I thought those little packets of dumpling wrappers from Twin Marquis seemed infinite. We used tofu and mushrooms for this mixture because that is all I had, but I think these would taste great with the additions of Chinese cabbage and carrots.

Vegetarian Dumplings

Ingredients:
Vegetable dumpling wrappers
1 lb tofu, crumbled
1 lb Shitake mushrooms, rinsed and diced
1 tablespoon minced fresh ginger root
1 tablespoon minced fresh garlic
1 tablespoon soy sauce
1 tablespoon sesame oil
1 1/2 tablespoons fake egg

Directions:
1. In a bowl combine the crumbled tofu and diced shitake mushrooms.
2. In a separate small bowl or glass, mix the ginger root, garlic, soy sauce, sesame oil and fake egg. Pour mixture over tofu and mushroom and combine to incorporate.
3. Wrap one tablespoon of mixture into each wrapper and gently pinch sides together to seal (see method in pork and chive recipe post)
4. Heat water in a wok and place steamer on top, cover and let heat until wok is boiling hot. Place the dumplings in a circle, place cover on wok and steam for 10-15 minutes.
This is what the inside of a vegetarian dumpling looks like!

Saturday, January 30, 2010

Classic Caesar Salad

Every now and again you just have to get back to your roots and find those foods that remind you of home. For me, one of those foods is caesar salad. My mom used to be a waitress at this sort of fancy restaurant and when she quit she went into the kitchen and tore a page out of the top secret recipe book. She wasn't leaving without that caesar salad recipe. I've never had a caesar salad as good as my mom's but this recipe that I'm about to share isn't the "top secret" recipe from the restaurant, it's actually just an incredible amazing combination of ingredients I picked up at local markets. Ordinarily I wouldn't blog about this since there is really nothing to it, but it tasted so good and crispy and the pictures came out quite nice, that I would feel guilty to not give a shout out to my very quick and easy and very store bought caesar salad.

Ingredients:
1 head romain lettuce, torn
1/2 cup freshly grated parmesan, plus more for serving
3-4 rye toast crisps
Whole Foods ceasar dressing

Directions:
1. Put the torn lettuce in a bowl and crumble the rye toast crisps over it. Add the grated parmesan and lightly toss. Just before serving add the ceasar dressing and toss just until incorporated.

Thursday, January 28, 2010

Garlicky Roasted Green Beans


Green beans are very delicious and even though I love to eat them, I realized that I have never cooked them myself! I was preparing a winter season meal and green beans seem very winter season to me. I used haricot green beans and they still maintained their crispness while taking on a strong garlic flavor. These were served with pecan crusted salmon and pumpkin biscuits and I shared the leftovers with some roasted chicken. It's fair to say these green beans are a wonderful accompaniment to pretty much anything. I added some lemon zest for fun and more for appearance but it actually added a lovely punch and I'd like to add more lemon zest next time, or perhaps orange zest. I used a bag of frozen green beans which I just let sit out for a while, until they are soft enough to absorb oil and garlic.

Garlicky Roasted Green Beans

Ingredients:
1 lb green beans
1 shallot, diced
6 cloves garlic, diced
Olive oil
Zest of one half a lemon
Freshly ground pepper

Directions:
1. Preheat the oven to 425 degrees. Place the beans on a pan and drizzle with olive oil, sprinkle the shallots and garlic on top and toss the beans around to incorporate.
2. Bake for 30-40 minutes, until tender and then mix in the lemon zest and serve.