"The people who give you their food give you their heart" - Cesar Chavez


Monday, November 30, 2009

Couscous with Dried Apricots, Raisins, Onions, Honey and Red Wine


A delicious accompaniment to a meat or fish meal with Mediterranean flavors, I made this as a side dish for some grilled fish. It's simple, easy, sweet, healthy and filling. Israeli couscous is thicker than traditional North African, yellow, couscous. It is small round semolina pasta. Israeli couscous resembles barley and after being rolled into small balls, the semolina pearls are toasted over an open flame. Most pasta are dried and not toasted, so the toasting of the couscous provides for a slightly nutty flavor and a very satisfying mouth feel. Israeli couscous has become a staple in my cabinet. It is versatile and absorbs flavors with ease. I also had some Calimyrna figs which are my favorite kind. They are slightly larger and have a golden skin and their flesh has a nuttier flavor.

Ingredients:
Israeli couscous
1 white onion, sliced
Dried apricots, halved
Dried calimyrna figs, halved
Raisins
Cinnamon
Red wine
Honey
Olive oil
Sliced almonds, for garnish

Directions:
1. Cook couscous according to directions on box.
2. Over medium heat, saute onions and olive oil in a pan for a few minutes. Add apricots, figs, raisin, some red wine and honey and sprinkle with cinnamon. Apricots and figs should soften, the onions should be translucent, and the red wine should be fragrant. Add in the couscous and mix until everything is evenly distributed. You may need to add more red wine and/or honey.

Sunday, November 29, 2009

Andy's Proscuitto Wrapped Halibut with Paprika


This was another incredibly delicious meal by Andy that could have been at a fancy restaurant. He took two ingredients that normally you wouldn't think go together and made them work fantastically. The ingredient list was simple and the tastes were wonderfully complimentary. Inspired by nothing more than the contents of his refrigerator, he used the prosciutto to add a whole new flavor to the tender and thick halibut.
Ingredients:
2 halibut filets
4 strips of prosciutto
Chili powder
Olive oil

Directions:
1. Sprinkle chili powder on both sides of the halibut filets. Wrap the fillets in one layer of prosciutto.
2. Broil the filets for a few minutes. Remove and put in a pan on a medium high flame with a bit of olive oil for a few minutes. Viola.

Saturday, November 28, 2009

Jeffrey's Meat Market & My Kosher Dad


My Dad's in town and I took him to the Lower East Side's Essex Market for a bit of history and watching the famous butcher, Danny, of Jeffrey's Meat Market do his butchering art. From as long as I can remember watching meat get sliced and diced from the animal body has been something that my Dad always enjoys. In Chinatown in San Francisco, he always liked to watch the butchers take apart the pigs and ducks. It's a little weird, I know, but one person's job is another's entertainment.
It was Friday afternoon and we were getting ingredients for Shabbat dinner. Danny, the butcher, just arrived to Jeffrey's Meat Market and my Dad and I stood to the side as he started preparing the freshly butchered lamb and chickens. The market was relatively quiet so he started talking with my Dad and I. He's a mixture of zany hippie with classic New York Jew and he had a whole story to share with us. The market originally belonged to his great-grandfather Jeffrey and it's been in the family ever since. He only buys the freshest and most local meats and often picks them up minutes after they have been killed. Oh yeah, and he is a chef. as he put it "Any good butcher has to be a good chef." Enjoying a seemingly nostalgic and energetic conversation with my Dad and he, he noticed the time and generously proposed to make a special lunch for my Dad and I. I was taken back and delighted with his offer but we had to decline the offer because, well, my Dad keeps kosher and Jeffrey's Meat Market does not. Finding humor in this, probably the only time his offer of lunch has ever been denied, Danny proclaimed that his Jewishness makes everything kosher. When that didn't convince my Dad he settled for taking characteristic pictures and giving my Dad an apron! They are bearing Danny's butchering knives like proud soldiers with Samurai swords. Below is their photo shoot, I'm behind the camera. Danny is on the left with the long hair; my Dad is in the cap.

And here is a photo of my Dad just as he caught a leg of lamb or pork that Danny tossed over to him.
                                                  
Well we didn't get a once-in-a-life-time opportunity to have lunch made by Danny but we got a great story and some once-in-a-life-time pictures! Oh yeah, and we got to keep the apron!

Wednesday, November 25, 2009

Whole Striped Sea Bass Roasted with Rosemary, Thyme, Mint and Lemon


My good friend, Aaron, and I wanted to try cooking a whole fish - a feat neither of us had ever attempted. We were both surprised with how easy it was to create our own sauce and cook up an entire fish. Aaron picked up a beautiful red striped Sea Bass which the fish monger thankfully gutted and scaled for us. We had a plethora of fresh herbs to make our own marinate and while we kept asking each other "Do you think we should do this or this?" the fish came out fantastic! It's quick cooking and quickly consumed. The amount of the herbs you'll want to blend for the marinade depends on the size of your sea bass and how herbalicious you want it to taste. Don't be cautious of making too much because the left over blend tastes great with roasted potatoes or mixed in with scrambled eggs! I'm looking forward to making this again and adding more items to herb medley such as kalamata olives, parsley and or capers.


Ingredients:
1 whole striped sea bass, cleaned, gutted and scaled
1 bunch of rosemary
1 bunch of thyme
1 bunch of mint
Lemon juice
Olive oil
Ground pepper
Sea salt
Red chili flakes
1 lemon, sliced

Directions:
1. In a food processor or blender, puree the rosemary, thyme, and mint with olive oil and lemon juice. Add in chili flakes and ground pepper. Taste and add more of any ingredient as necessary. Process until you have an even blend of ingredients. Set aside.

2. Turn oven on to high broil. Line a pan with tin foil. Carefully make 3 cuts on both sides of the fish. Your knife should hit the bones.

3. Sprinkle sea salt all over both sides of the fish. Spread the herb mixture generously on both sides of the fish making sure to fill the 3 cuts on the sides.

4. Broil the fish for 5 minutes on each side. Turn oven on to 450 and roast for 20 minutes. Remove and let cool for a bit. Serve warm with couscous or over a bed of greens! Garnish with lemon slices.

Tuesday, November 24, 2009

Broccoli Soup with Toasted Corn Crutons


No matter how hard I try, I can't get pretty soup pictures. I try to clean the edges of the bowl but my imperfections always come out in soup pictures. Also, because the soup is still hot off the stove when I sprinkle the parmesan, it instantly melts into the soup. One day I hope to have lovely soup pictures. Until then, you are just going to have to trust me that this soup is really tasty and comforting. With some crunchy bread, this soup hits the spot. I don't have an immersion blender so I have to process it in a food processor in two separate batches, so I understand why purchasing an immersion blender would save a ton of cleaning. That may have just sounded like an advertisement, but until this evening I truly believed I was better off without an immersion blender. If my cold weather = hot soup kick continues, I think I will get an immersion blender and perhaps then I will have pretty soup pictures! I found this simple recipe on Inspired2Cook and decided to change it up and see/taste what happens. I'm quite excited that I have a left over tub of this in my refrigerator for lunch tomorrow!

Ingredients:
(Makes 4 servings)

2 tablespoons unsalted butter
1 medium onion, chopped
4 teaspoons minced garlic
2 sweet potatoes, peeled and cubed
3 pinches dried chili flakes
2 pinches oregano
1 pinch ground pepper
4 cups water
3 teaspoons low sodium vegetable bullion
1 16-ounce package frozen broccoli florets, thawed
1/2 cup white corn kernels
Grated parmesan cheese

Directions:
1. Melt the butter in a sauce pan over medium heat. Add the garlic and onions and saute until the onions are translucent and the garlic is fragrant. Add the sweet potatoes, chili flakes, oregano, pepper and water and bring to a boil. Add in the bullion to dissolve.
2. Adjust the heat to a simmer and cook uncovered until the sweet potato is tender to a fork, 8-10 minutes. Add the broccoli and simmer for 3 minutes.
3. In batches, puree the soup in a blender or processor. Put the soup back into the pot and return to a medium low heat.
4. Bring oven to broil setting. Drizzle olive oil on a pan, place corn kernels on pan and sprinkle with pepper. Broil the corn for 4 minutes, or until toasted and crunchy.
5. Sprinkle the parmesan and corn on the soup and enjoy!

Monday, November 23, 2009

Wild Rice Pilaf with Roasted Sweet Potatoes and Honey Dressing


My Dad was stopping through New York to visit on his way to Israel. He is a very healthy eater and an avid fan of wild rice. I had actually never cooked wild rice before and I made the mistake of thinking it could be cooked like regular rice in a rice cooker. No, I was definitely wrong and I learned the hard way. Wild rice is more like a noodle in that it doesn't absorb all the water it is cooked it and it will need to be drained. But, similarly to rice, it takes about 40-50 minutes before it is ready to eat. I love sweet potatoes and I decided to roast it with some nutmeg and olive oil. The sweetness of the corn and squash with the peppery of the leeks and the savory rice was a perfect combination. I made a little improve honey dressing which complimented it quite nicely. I was hoping to make enough for my lunch the next day but that didn't seem to happen.

Wild Rice Pilaf with Roasted Sweet Potatoes and Honey Dressing

Ingredients:
Wild rice
Sweet potatoes
White corn kernels
Leeks, the white part only sliced
Olive oil
Nutmeg
Pepper

For Dressing: (Makes 3/4 cup dressing)
1/4 olive oil
Nutmeg
2 tablespoons honey
Ground pepper
1 tablespoon lemon juice
Water to thin

Directions:
1. Pre-heat the oven to 450 degrees. Peel the sweet potatoes and cut them into cubes. Place in a bowl and drizzle with olive oil and nutmeg and toss to coat evenly.
                               
2. Place sweet potatoes in one even layer on a pan and roast in the oven. Flip the cubes half way through to roast evenly. Remove from oven when they are tender to a fork, about 40 minutes total.
3. Cook wild rice according to directions on package and drain.
4. In a non-skillet over medium heat saute leeks with olive oil and pepper, add in corn. Mix in wild rice and butternut squash and saute until ingredients are evenly mixed.

5. To make the dressing mix together the olive oil, honey, lemon juice, nutmeg, pepper and a bit of water if you need to thin it out. Mix well with a fork and drizzle on the pilaf just before serving.


Friday, November 20, 2009

Pumpkin Whoopie Pies


"To love and to be loved is to feel the sun from both sides" - David Viscott

I didn't know what in the world a whoopie pie was until I came out to the East Coast. I probably could have made an educated guess and I would have been excited regardless just because of the word pie, but I didn't really understand what they were until I saw chocolate whoopie pies at the local B-Cup Cafe. Then, when my sister came to visit, we had delightful red velvet whoopie pies at Trois Pommes in Brooklyn. So, because it's fall and I love all things pumpkin, I decided it was time to try and make these whoopie pies and do it with pumpkin. After conducting a pumpkin whoopie pie recipe search, I found this one. With a little bit of adapting, I created a modified version. I would definitely love to make these again and add in crushed walnuts. I also learned a valuable lesson: it is very very difficult to make whipped frosting without an electric mixer. I had to improvise a bit, but I think I need electric mixer. I'll probably get one in a year. These whoopie pies are dangerously delicious. Essentially, they are cupcake tops (which we all can agree are the best part) sandwiching a delicious frosting. Make these and don't expect for them to stick around for that long.

Pumpkin Whoopie Pies
(Makes 12 pies; please note that the pies are large and can be shared)

Ingredients:
3 sticks butter (2 sticks melted, 1 softened)
2 cups packed light brown sugar
4 eggs, I used fake eggs, beaten
2 cups canned pumpkin puree
1 tablespoon nutmeg
1 tablespoon cinnamon
3 teaspoons vanilla extract (2 for the batter and 1 for the frosting)
2 teaspoons baking powder
2 teaspoons baking soda
1 1/2 teaspoons salt
3 1/3 cups flour
8 ounces cream cheese
2 cups powdered sugar
Store bought whipped frosting - if you don't have an electric mixer, go ahead and cheat on this one.

Directions:
1. Preheat the oven to 350 degrees and line two baking sheets with wax paper.
2. In a large bowl, mix together the melted butter and brown sugar until smooth. Whisk in the eggs, pumpkin puree, nutmeg, cinnamon, 2 teaspoons vanilla, baking powder, baking soda, and the salt. Use a rubber spatula to fold in the flour in batches.
3. Using a spoon place generous mounds evenly on the baking sheets. 6 mounds per a sheet, you will need to do this in two  batches. Bake the pies until they are springy to the touch, about 10 minutes. Then transfer to a rack to cool completely.
4. Either using an electric mixer or all your arm energy, mix toegther the cream cheese, powdered sugar, a pinch of salt and 1 teaspoon vanilla until light and fluffy. Please note: by hand this can take a long while. So I decided to spread the store bought frosting on one side of the pie and my handmade mess frosting on the other side. When sandwiched together it was great!
5. Spread the flat side of the cakes with the frosting and sandwich them together. YUM!

These whoopie pies may require two to eat it...or fight over it.

Thursday, November 19, 2009

Roasted Mushrooms Stuffed with Spinach, Cheese, and Bacon


These little bite size stuffed mushrooms are rich and decadent. I would have preferred to use slightly larger mushrooms because I was not expecting for them to shrink when roasting. They are a lot of work but worth it and they can be made ahead of time and just heated up when you are ready to eat. The left over stuffing tastes great with eggs the next day! If I were to make these again I would want larger mushrooms and perhaps use crab meat instead of bacon. I also think some chopped walnut pieces would taste delightful as well. I picked up some beautiful slices of bacon from Jeffrey's Market in the Lower East Side and the smell was so delicious and intense when making the slices crispy. I adapted these from this recipe I found on epicurious.com. The bacon pieces were like lovely little surprises in each mushroom!

Roasted Mushrooms Stuffed with Spinach, Cheese and Bacon
(The stuffing is enough for about 48 mushrooms but I just made about 25 mushrooms and used the rest of the stuffing in a sandwich and with scrambled eggs)

Ingredients:
8 ounces bacon slices
1 cup chopped onion
1 10-ounce package chopped, frozen spinach, thawed, squeeze dried
3/4 cup feta crumbled
3/4 cup gorgonzola crumbled
1 teaspoon dried crushed red pepper
Button mushrooms, stemmed
1/4 cup olive oil

Directions:
1. Preheat the oven to 375 degrees. In a skillet cook the bacon until it is crispy about 8 minutes. Press the bacon on paper towels to drain and crumble into small pieces. Set aside.
2. Sautee the onion in the skillet over medium heat until the onion is tender. Transfer the onion to a medium bowl and let cool. Mix in the bacon, spinach, feta, gorgonzola, and crushed red pepper. Season with pepper to taste.
3. Line to large baking sheets with tin foil. Toss the mushrooms in 1/4 cup olive oil to coat and sprinkle with pepper. Place the mushrooms on the baking sheet with the rounded side down. Bake the mushrooms until their centers fill with liquid, about 20-25 minutes depending on how large the mushrooms are. Take the pans out of the oven and turn the mushrooms over to drain out the liquid. Spoon one heaping teaspoon of filling into each mushroom. (This is the wonderful do-ahead part, you can totally cover the mushrooms and chill them until you are ready to bake and serve, WOO-HOO!)
4. Bake for 10 minutes at 375 degrees and serve warm.

Wednesday, November 18, 2009

Meatballs with Parlsey and Parmesan


I have never made meatballs before but I found this recipe on epicurious.com had great reviews and seemed easy enough for a beginner-meatball-maker. I adapted this recipe to cut down on the salt and increase the herbs. I made these using my friend's extra large and in-charge skillet so it only took me 3 batches to make all 44 (YES 44!) meatballs. These tasted great alone or with marinara sauce. I would definitely like to make these again and bake half and freeze the other half to have later. I also found that, when frying them, they didn't fall apart if I chilled them before cooking. After the first batch, the chilled the remainder before making. These can definitely be a satisfying appetizer but I bet they would taste lovely with pesto and spaghetti, an Italian sub, or on a pizza!

Ingredients:
4 large eggs, I used fake eggs
1/2 cup Italian herb breadcrumbs
6 tablespoons grated parmesan
3 tablespoons olive oil, plus more for frying
1/3 cup chopped fresh parsley
5 large garlic cloves, minced
1 teaspoon ground black pepper
1 teaspoon oregano
2 lbs lean ground beef

Directions:
1. In a large bowl, stir together the eggs, breadcrumbs, parmesan, olive oil, parsley, garlic, pepper and oregano. Add in the ground beef and mix thouroughly. Form 2 inch diameter meatballs and place on a tray. Cover and chill for about 45 minutes, this will make it easier to keep the meatballs together when you fry them.

2. Pour enough olive oil in a heavy large skillet to coat the bottom; heat over medium-low heat. Working in batches add the meatballs and fry until brown and cooked through turning frequently and adding more oil as needed. Transfer to a plate and serve! Yum!

Tuesday, November 17, 2009

Dark Chocolate and Hazelnut Pear Upside Down Cake

I had some friends coming over for dinner and I wanted to make a delicious dessert. Normally, when searching for the perfect dessert recipe my challenge isn't finding one, but rather which one to make! I came across this recipe while browsing dessert cookbooks at Barnes & Nobel. I found the book Rustic Fruit Desserts by Cory Schreiber and Julie Richardson and came across this delicious sounding and even better looking chocolate upside down pear cake! I quickly scribbled down the recipe in my journal and I adapted it only slightly to add hazelnuts and more chocolate. This cake was a bit of an ordeal to make, or maybe that's only because it was my first time caramelizing sugar, but in the end it looked beautiful and tasted fantastic, especially with a scoop of vanilla ice cream. I was also able to wrap the cake and have it for dessert over the next couple of days. I used one of those spring-form pans with the removable bottoms which made it a little easier to invert the cake at the end.

Ingredients:
1 tablespoon unsalted butter, at room temperature, for the pan

Fruit Topping
1 cup sugar
1/4 cup water
2 firm but ripe pears, peeled and cored and cut into 12 slices each

Cake
1/4 unsalted butter
4.5 ounces dark chocolate, chopped
1/4 cup chopped hazelnuts
1 cup flour
1/3 cup unsweetened cocoa powder
3/4 teaspoon baking soda
1/2 teaspoon salt
3/4 cup sugar
2 eggs, I used fake eggs
1 teaspoon vanilla extract
1/2 cup buttermilk

Directions:
1. Butter a 9 inch round baking pan
2. In a heavy sauce pan, mix the sugar and water until the sugar dissolves. Bring the mixture to a boil over medium heat, then cover and cook for two minutes. Uncover the sauce pan and continue to boil the sugar, gently and slowly stirring to cook the caramel evenly until it becomes a dark amber color. You will need to have a spatula on hand and a cup of cold water. Dip the spatula in cold water run it down the sides of the pan to prevent the sugar crystals from forming and clumping along the sides of the pan. This entire process can take a little while, in the ball park of 15-20 minutes with constant stirring. Below is a photo progression of the sugar caramelizing process:
3. When you have the dark amber color above, carefully and slowly pour the mixture into your buttered cake pan. The pan will instantly become hot so make sure to have oven mitts on.
4. Place the pear slices on top of the caramel in a circle and then filling in the center.
5. Preheat the oven to 350 degrees.
6. Place the butter and chocolate in a small sauce pan and melt over low heat, stirring occasionally.
7. In a bowl, mix together the flour, cocoa, baking soda, and salt. Pour in the melted chocolate and butter and mix with a whisk sort of rapidly for 5 minutes. (If you have an electric mixer, this would be the time to use it for 3 minutes). Add in the eggs, one at a time and scraping down the sides of the bowl to make sure everything is incorporated. Stir in the vanilla and buttermilk and lastly, stir in the chopped hazelnuts.
8. Pour the batter over the pears in the prepared pan and place in the center of the oven for 40-45 minutes.
9. Cool on a wire rack for 15 minutes, and then invert the cake on a plate, leaving the pan on top for 5 minutes before carefully removing. Serve the cake with ice cream and prepare to be hurtled into chocolate heaven!

Monday, November 16, 2009

Southwestern Breakfast Scramble


This breakfast scramble is healthy, tasty and so easy to make. We enjoyed it with a bit of pita bread and a small side cabbage salad. It tasted great the following day too! You're probably wondering what makes this egg scramble Southwestern - really it's just the use of red and green bell peppers, onion and dried chili pepper flakes. I would love to make this again and wrap it up in flour tortillas to make breakfast burritos, or add in some beef. This is also a great dish to throw in any left-overs of cooked meat and vegetables or left over rice dishes as the flavors easily compliment. My favorite utensil for making scrambled eggs is a good silicone spatula that is not slotted. I find these easy to use for cooking and serving.

Ingredients:
6 eggs (whisked), I used fake eggs
1/4 cup finely diced red bell pepper
1/4 cup finely diced green bell pepper
1/4 cup finely diced yellow onion
1 large tomato, chopped
Broccoli florets
1 cup white corn kernels
1 cup sliced and cubed tofu
2/3 cup sliced black olives
Garlic powder
Ground pepper
Dried chili pepper flakes

Directions:
1. Heat some olive oil in a skillet over medium high heat and sautee the onions and red and green bell peppers until the onions are translucent.
2. In a separate bowl, whisk together the eggs with the garlic powder, ground pepper and dried chili flakes. Add egg mixture to the onions and peppers and start to scramble. Once the egg begins to gain texture, add in all the other vegetables and continue to scramble. You may want to add additional dried chili pepper flakes or more garlic powder if you desire. Serve  and enjoy!

Friday, November 13, 2009

Moroccan Lamb Kebabs with Apricots and Onions


This was my first time making lamb and let's just say - I'm ready to start making many different lamb dishes! On a sunny Saturday, I took my friend's little walking-shopping cart and walked down 20 blocks to the Essex Market. After perusing the market to gather fresh fruits and vegetables, I landed at Jeffrey's Meat Market, a meat lover's institution run by Jeffrey himself! Running the place like a rock star with long gray hair, he is flirtatious with the ladies and buddies with the guys and he is eager to help you make the best meat decisions for your meal. I picked up 4 pounds of well trimmed boneless leg of lamb and he even cut it into kebab size cubes for me! I just love LOVE Moroccan food and ever since I got my Emril Double Burner Grill (it's grill on one side and smooth for pancakes on the other!) I am all about good excuses to use it! I came across this recipe while doing an extensive Moroccan cooking search and so I changed it up a bit and put it to the test. These kebabs were delicious with some golden Israeli couscous with almond slices. Unfortunately, due to circumstances beyond my control (drink-induced hunger) I couldn't get any pictures of the kebabs with the couscous. I suppose I will have to make these again....sigh. Can't wait!

Moroccan Lamb Kebabs with Apricots and Onions
(Makes about 40 kebabs)

Ingredients:
3/4 cup olive oil
2/3 cup lemon juice
10 large garlic cloves, minced
1/4 cup chopped fresh mint
2 teaspoons salt
2 teaspoons ground black pepper
2 teaspoons ground coriander
1 teaspoon ground cumin
4 lbs boneless leg of lamb cut into cubes

Skewers
Whole dried apricots (2 per skewer)
4 red onions cut into chunks

Directions:
1. Whisk the first 8 ingredients in a bowl to blend. Remove 1/2 cup of it to use to marinate the skewers while they are on the grill, cover and chill. Add the lamb and mix around with your hands to evenly coat all the lamb in the marinade. Cover and let marinate for at least 2 hours, preferably 6-8 hours or overnight.

2. Prepare the grill on medium high heat and generously drizzle olive oil over it. Remove the lamb from the marinade and arrange the skewers. I chose to put one apricot on the each end and have two lamb chunks divided by an onion chunk in the middle: apricot, lamb chunk, onion chunk, lamb chunk, apricot. Grill the skewers until they soften and brown, turning about 4 times and basting with the extra marinade. The skewers may take about 8 minutes for a delicious medium rare cooking but you may need to move them from the outer parts to the inner part of the grill to prevent the apricots from burning.

Enjoy with golden couscous and sliced almonds! Finish your meal with some hookah and call it a night!

Thursday, November 12, 2009

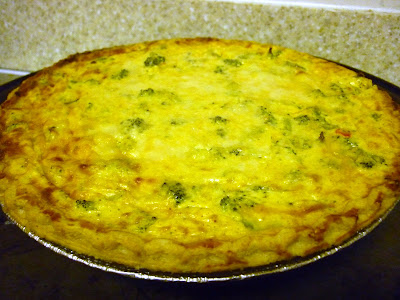
Broccoli Cheddar Quiche


Quiche is one of those universally enjoyed foods that tastes delicious for breakfast, lunch and dinner! And broccoli and cheddar are one of those match-made-in-heaven combinations that works for soups, casserols, quiche and probably a whole flurry of other items. This delicious deep dish quiche dissappeared rather quickly. This recipe is simple and easy and the only time requirement is baking and cooling. I really wish I had a slice of this right now. My quiche is adapted from this recipe in the last issue of Gourmet magazine.  With so many delicious kinds of quiche, I would love to have a "Unique Quiche" party where everyone brings a quiche and we listen to QUeen and talk about QUilting....okay, I am getting ahead of myself with the QU theme. I used a bag of frozen broccoli florets for this that I thawed out and heated in the microwave for a couple minutes.

Broccoli Cheddar Quiche

Ingredients:
1 deep dish pie shell
12 oz broccoli florets (1-2 inches of the stem attached)
4 large garlic cloves, minced
6 large eggs, 1 1/2 cups fake eggs are a perfect substitute!
1 1/2 cups buttermilk
1/4 teaspoon ground nutmeg
1/2 teaspoon cayenne pepper
2 tablespoons chopped onion
2 cups grated cheddar
1/4 cup grated Parmesan
Pinch of salt and pepper

Directions:
1. Preheat the oven to 375 degrees and place the rack on the middle level in the oven.
2. Whisk together the garlic, eggs, buttermilk, nutmeg, cayenne, onion, and cheddar in a bowl. Sprinkle with salt and pepper. Pour the filling into the pie shell and sprinkle the parmesan on top.
3. Bake the quiche until it is just set and golden on top, about 45-55 minutes. Cool for at least 20 minutes.

Wednesday, November 11, 2009

Chocolate-Walnut Pumpkin Bread


It's November and it's time to make as many pumpkin centered dishes and goods as possible. When you find a good recipe for moist, dense and delicious pumpkin bread, you better hang on to it, because it's the perfect jumping off point to make variations with additional ingredients. Pumpkin bread is also easy to make and it's a great little surprise gift for friends. I adapted this bread from this recipe. The extra sugar sprinkled on top adds a lovely crunch to the smooth bread. This bread tastes fantastic with some apple butter and tea or chai ice cream!

Chocolate-Walnut Pumpkin Bread

Ingredients:
2 cups flour
1 teaspoon nutmeg
1 teaspoon cinnamon
1 teaspoon baking powder
1/2 teaspoon salt
1/2 teaspoon baking soda
6 tablespoons unsalted butter, melted
1 cup plus 1 tablespoon of sugar
2 large eggs, fake eggs are perfect
1 cup canned pumpkin puree
1 teaspoon vanilla extract
2/3 cup buttermilk
1/2 cup walnuts
1/2 cup chocolate chips

Directions:
1.  Preheat the oven to 350 degrees and butter a 9x5 dish.
2. In a bowl, whisk together the flour, nutmeg, cinnamon, baking powder, salt and baking soda together. Whisk in the melted butter. Gradually add in the eggs, pumpkin, vanilla and buttermilk until you have a nice consistency. Fold in the walnuts and chocolate chips. Transfer the batter to the dish and sprinkle the tablespoon of sugar on top.
3. Bake the bread until a toothpick comes out clean, about 1 hour and 10 minutes. Let the bread cool on a rack for about 15 minutes before carefully loosening the edges with a knife and removing.

Tuesday, November 10, 2009

10 Layer Dip!


My friend, Maxine, and I made this as a party dip recently. This is one of those dips that you can't go wrong with at the party. The only problem was that because it was so deep, you couldn't get all the layers on one chip. Actually, it was quite messy to eat and required one hand to hold the chip and the other as caution for dripping layers. I should disclose that all ten layers are not unique, but rather some are doubled up. There are no rules to this dip and every variation will taste delicious! The layers of lettuce and onion add a lovely crunch to the otherwise creamy texture. Also the contrast between the melted cheese layer and the fresh cheese layer helps tie it all together. Growing up in California, every party I went to had one of these dips there and there was never a "correct" order of layers, it was all about the bean and cheese combo with chips, all the other layers are like extra things to beef it up. Speaking of, I'm sure a shredded beef layer would taste great too!

10 Layer Dip

Ingredients:

1 can black beans
12 oz mixed cheese, grated
16 oz guacamole
8 oz sour cream
Salsa
Lettuce, shredded
Tomatoes, chopped
1/2 white onion, chopped
Pico de gallo

Directions:
1. Pre-heat the oven to 350 degrees. Place the beans evenly across the bottom of a glass dish. Sprinkle half the cheese on top of the beans. Bake for about 10 minutes, until the cheese is completely melted.
2. Spread the guacamole on top of the cheese, followed by a layer of sour cream, salsa, shredded lettuce, tomatoes, onion, pico de gallo and lastly the remaining cheese.


Monday, November 9, 2009

Spicy Citrus Tilapia


One of my best friends, Maxine, was visiting for a long weekend and we prepared a lovely dinner of tilapia and salad for our first meal together. She is also a fan of heat so I was free to be generous with the spice! I used one habanero and, as expected, it went a loooonnng way. Tilapia cooks very quickly which makes it perfect for week night meals. I have used tilapia in the past to make fried fish tacos, and while i didn't want to fry these fillets, I wanted the spicy and citruis flavor to stick so I used a bit of flour as a sort of glue. We ate this over some basmati rice and it was a wonderful combination! The rice offset the heat and made the bites more edible. With a squirt of lime, this dish is super flavorful!

Spicy Citrus Tilapia
(Serves 3)

Ingredients:
4 fillets of tilapia
2 tablespoons flour
1 1/2 teaspoons ground ginger
A bit of ground pepper
Zest from 1 lemon
2 teaspoons lemon juice
1 habanero, finley diced
Lime slices for garnish
Olive oil

Directions:
1. On a plate, mix together the flour, ginger, and pepper. Dredge the tilapia fillets in the flour mixture.
2. Heat olive oil in a pan over medium high heat and add the diced habanero. Put in the tilapia and drizzle the lemon juice evenly over the fillets. Sprinkle the lemon zest on top. The fillets should cook for about 3 minutes per a side. Garnish with lime slices, serve with rice and enjoy!


Sunday, November 8, 2009

Mini Apple Butter Pies


On a recent trip visiting my friend's family down south, we visited his grandparents, Libby and Robert, who make an award winning apple butter! Every fall, the local community gathers to make cases of this apple butter. For decades they have peeled, cut and churned the apple butter by hand. This is the first year that they have purchased a new electric mixer and there are some sore feelings about this as it is not producing the same great taste of past years. When we went to visit Libby and Robert, they were at the local volunteer fire station with the other elders of the community peeling apples. We got a little tour of the process and a handful of jars to bring back! Fortunatley, we were able to get some of the last jars from the 2008 batch which were made the old fashioned way.  Here is a picture of Libby and Robert peeling the apples.

I have never had apple butter before but when I tried it for the first time, on a scoop of vanilla ice cream, it was delicious. Ironically, apple butter doesn't actually have butter in it. In fact it is quite similar to apple sauce except that it is much more appely and with a lot more cinnamon and cloves. Apple butter tastes great over ice cream, spread on a bagel or a biscuit. I'm sure there are many other uses for apple butter and luckily I have a huge jar so I will get to experiment a lot. I had some left over pie dough and I remember as a child, using the scraps of  my mom's pie dough to make mini jam pies. I decided to make mini apple butter pies and add in some nuts for extra crunch. These were superb with vanilla ice cream!
Mini Apple Butter Pies

Ingredients:
1 store bought pie crust
Apple butter
Walnuts
A bit of egg whites
Cinammon

Directions:
1. Preheat oven to 375 degrees.
2. Roll the pie crust into a ball and roll it out on a floured surface until you have a nice thin sheet. Using a circular cookie cutter (I don't have one and used a chickpea can which worked just fine) cut out small rounds and place them on a baking sheet.  Gather the dough scraps and roll out and cut again until you have used all the dough.
3. Finely chop up the walnuts and mix them in a small bowl with a bit of apple butter.
4. Place very small dollops on the dough rounds and gently fold one edge of the rounds over the apple mixture and press down to seal close on the other side. You should have a nice half moon shape.

5. Brush a bit of egg white over the mini pies and sprinkle a dash of cinnamon on each one. Bake in the oven for about 7 minutes until it is slightly golden around the edges.

Saturday, November 7, 2009

Bakery Review: Levain Bakery, Home to the World's Best Cookie. Period.


I don't want to sound like a cookie snob, but I have been around and had some pretty freaking awesome cookies. The cookies from Levain Bakery, however, send me over the edge. They blow all the other cookies out of the cookie batter (corny joke I know). My mom first introduced me to Levain Bakery after she saw the cookies on Oprah. She showed up at work with a bag full of delicious treats from the bakery and I shared it all with my co-wrokers and I went back the following morning to try the cookies for myself. Inside the bakery, 7 NYPD came in and proclaimed "You know it's a good bakery when the cops are showing up for cookies." This small bakery churns out huge, gooey cookies that are crunchy on the outside and smell nothing less than incredible. When my good friend, Maxine, came to visit in the spring time, we went there and she was hooked. Here is a picture of the first time she tried these magnificent and magical cookies.

When Maxine came to visit just last week, she picked up some cookies for us to have as dessert in the evenings. The cookies are $3.75 a pop which is pricey for cookie, but is cheap considering the pleasure it brings and they are huge! It was a wonderful surprise and with milk these cookies are divine. The most talked about cookie at Levain Bakery is the chocolate chip walnut cookie pictured above. This one is also Maxine's favorite. My favorite is the Dark Chocolate Peanut Butter cookies.

Unlike most chocolate peanut butter cookies, where the peanut flavor is condensed in peanuts, the use of peanut butter makes for a more powerful peanut punch and it melts in with the rest of the cookie so it is consistently gooey and not crunchy. The night before Halloween, Maxine and I dressed up and went dancing until the wee hours. I was Where's Waldo and she was a 40's pin-up star. At the end of the night, or should I say in the early morning, these cookies were the perfect completion before going to sleep.

After all that dancing we chose the cookies below over traditional late night pizza without any hesitation. These are finger licking delicious and will change your life. Get ready to have some serious cravings!

167 West 74th Street (Between Columbus and Amsterdam)
212.874.6080